

*It is alway my intent to be 100% transparent. Organic Gemini kindly gifted the TigerNuts to me for this recipe. This review reflects my personal opinions and experience with the product.
There’s a new nut in town! I’m excited to welcome Tigernuts to the table.
And it’s soy, dairy, grain, nut and seed free. AND the facility that processes them is dedicated gluten-free, peanut-free and tree nut-free to prevent any possible cross-contamination.
I am personally sensitive to many nuts and seeds and I know thousands of others share this issue. That’s why I’m especially excited to have tigernuts fill a void in my diet.
WHAT ARE TIGERNUTS?
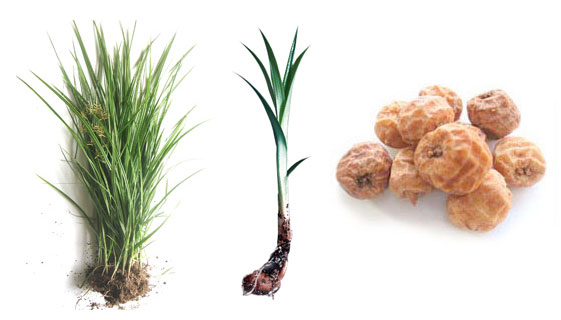
I discovered tigernuts earlier this year at PaleoFx. Tigernuts are a small root vegetable also called tubers that are found at the root of cyprus grass. Originating from Northern Africa and the Mediterranean, tigernuts are not related to nuts at all, despite their misleading name. And no, they have nothing to do with tigers either.
This photo shows the tigernut from plant to edible product.
HOW DO YOU EAT TIGERNUTS?
Most commonly eaten in Spain and Northern Africa, tigernuts are enjoyed as a snack, can be blended into “milk” or horchata, and also ground into a flour to use in gluten-free baking.
To be honest, it was not love at first bite. The texture is chewy and they have a sweet vanilla after-taste. Not what I expected in a nut substitute. When I think nuts, I think salty. It is similar to a hazelnut but without the crunch.
Now the Horchata, that’s a different story. At PaleoFx I bought two bottles on the spot, enjoying one with lunch and another with dinner that day. So good. Horchata originates in Spain and is enjoyed there year-round. I’m happy it has finally made it’s way to my Whole Foods shelves.
The tigernuts themselves are much better when soaked in water from 12-24 hours before eating. When soaked they reconstitute and regain their starchy consistency, making them less chewy and dry. Soak them one for one, or one cup of water per every cup of tigernuts.
I like to make a granola with them by combining the soaked tigernuts, coconut chips, apple chips and raisins. They really shine when making treats and baking though. Tigernuts easily substitute for almonds or walnuts. Throw them in the food processor with dates, raw cocoa powder and salt, then roll them into balls and you have a yummy on-the-go treat. This method is what led to the creation of my tart recipe.
TIGERNUT NUTRITION
These little tubers are quite nutritious. Tigernuts contain the highest amount of a special kind of fiber called resistant starch. The starch is a beneficial prebiotic that feeds the good bacteria in your gut, leading to healthier digestion.
Unlike many other starchy foods like potatoes, tigernuts contain nourishing fats. The fatty acid profile is similar to that in olive oil, with a high percentage of monounsaturated fats.
WHERE TO BUY TIGERNUTS
1. Purchase directly from Organic Gemini’s online store.
2. Find Organic Gemini TigerNuts here on Amazon.
3. Sold at many Whole Foods locations and natural foods store across the US. Use this map to find one near you.
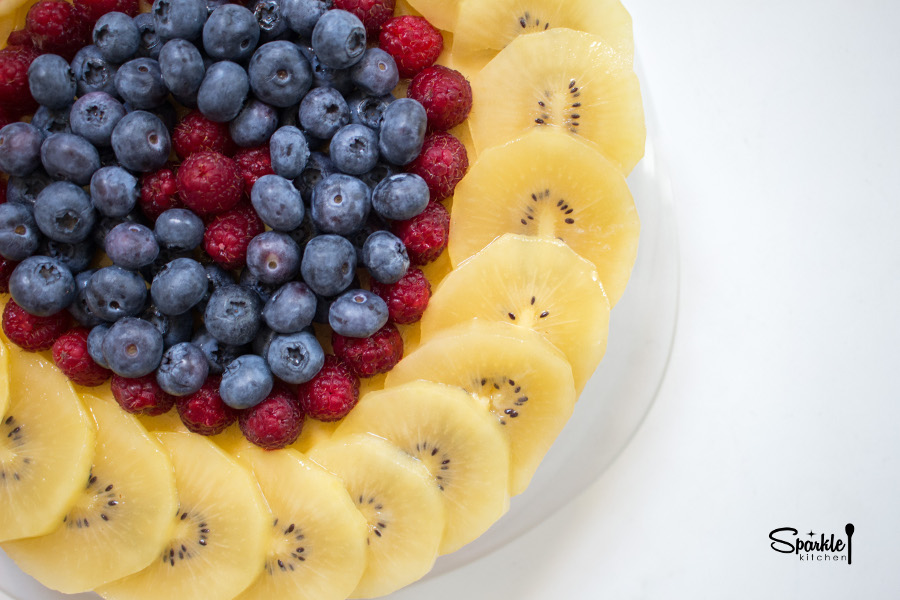


BERRY-LEMON TART WITH TIGERNUT CRUST
I experimented with a few different tigernut recipes before having success with this Berry-Lemon Tart. Since nuts and seeds are a sensitivity for me, I was excited to use tigernuts in a no-bake crust. They worked beautifully! Right texture, right flavor. Perfection.
Enjoy!

- TIGERNUT CRUST
- 2 cups TigerNut pulp - tightly packed (1 cup soaked in 1 cup water for 24 hours, blended with 3 cups warm water)
- 6 pitted medjool dates - chopped
- ½ cup unsweetened coconut flakes
- 1 tsp vanilla extract
- ½ tsp salt
- FILLING
- 7 egg yolks
- ½ cup granulated maple sugar
- ⅓ cup lemon juice (juice of 2 lemons)
- 1 tbsp lemon zest
- ½ cup thick coconut cream - from canned fullfat coconut milk
- 2 tbsp arrowroot flour
- Fruit for topping
- CRUST
- Start by soaking 1 cup of TigerNuts in 1 cup of water for 24 hours. Then blend the TigerNuts and water in a high-powdered blender, adding 3 more cups of warm water. Blend until fully processed.
- Separate the “milk” from the pulp by straining out the pulp with cheesecloth. Place a piece of cheese cloth over a wide-mouth mason jar or bowl and secure it in place with a rubber band. —
- Pour all contents from the blender into the jar. The cheesecloth will catch all the pulp, which you will place into a large bowl. As you remove the pulp, squeeze it over the jar to remove the excess liquid.
- Store the “milk” in the fridge and consume over the next two days. TigerNut Milk sours quickly.
- Now you are ready to make the crust with the pulp.
- Measure out 2 tightly-packed cups of pulp and place into a large food processor. Add in dates, coconut, vanilla and salt. Process for 3 minutes until it begins to clump. Scrape down the sides periodically to ensure everything is fully incorporated.
- Grease a 9” spring-form pan with 1 tsp of coconut oil.
- Press the crust into the bottom of the pan and set aside.
- FILLING
- For the filling, create a double boiler. Fill a medium-sized sauce pan with 2” of water and bring to a simmer.
- While the water comes to a simmer, whisk together the egg yolks and sugar in a large metal bowl. Then add lemon juice and zest.
- Place bowl on saucepan so that it is sitting on top of it. Stir the mixture continuously. Be aware that the eggs can begin to clump if you stop stirring and the consistency will not be right.
- After 2 minutes of stirring, add in the coconut cream.
- Then very gradually stir in the arrowroot flour, dusting it over the mixture to incorporate.
- Continue stirring until the filling thickens and fully coats the back of a spoon.
- Remove from heat and allow to cool in metal bowl for 10 minutes.
- Once cooled, pour over the TigerNut crust.
- Refrigerate for 4-6 hours before decorating with your favorite berries. Raspberries, blueberries and strawberries pair perfectly with the lemon filling.
- Time does not account for 24 hours needed to soak tigernuts OR time for chilling in the fridge.
- Use the milk exactly as you would any nut milk. It's delicious in coffee and tea!


